Introduction Link to heading
Welcome! This is the first part of a series of tutorials on building web applications with Buffalo. Buffalo is a Go web framework influenced by the Ruby on Rails framework. It makes building web apps with Go easy and fun. We will be building a simple blogging app. You can find the source code of the final version of the app at https://github.com/mikaelm1/Blog-App-Buffalo. In this chapter, we will cover the basics of how Buffalo is structured, become familiar with its CLI, create our User model, learn about migrations, and implement authentication.
Table of Contents Link to heading
- Prerequisites
- Getting Started
- Users Resource
- Register Users
- Login and Logout
- User Middleware
- Conclusion
Prerequisites Link to heading
Make sure that you have the following installed:
Getting Started Link to heading
Go to your $GOPATH and type:
buffalo new blog_app --db-type=sqlite3
This tells Buffalo to create a new project with the name blog_app and to use a SQLite3 database for storage. This will generate the project with all of the required directories and configuration files. There should be a file named databse.yml. This file holds all the configuration information for your databases. Open it up and make sure the URLs to your sqlite3 databases are correct. The database URLs should be of the form:
$GOPATH/srcgithub.com/$YOUR_GITHUB_USERNAME/blog_app/blog_app_development.sqlite
If the URLs are not in this format, fix them. Now type buffalo dev and visit localhost:3000 in your browser. You should see something like this:
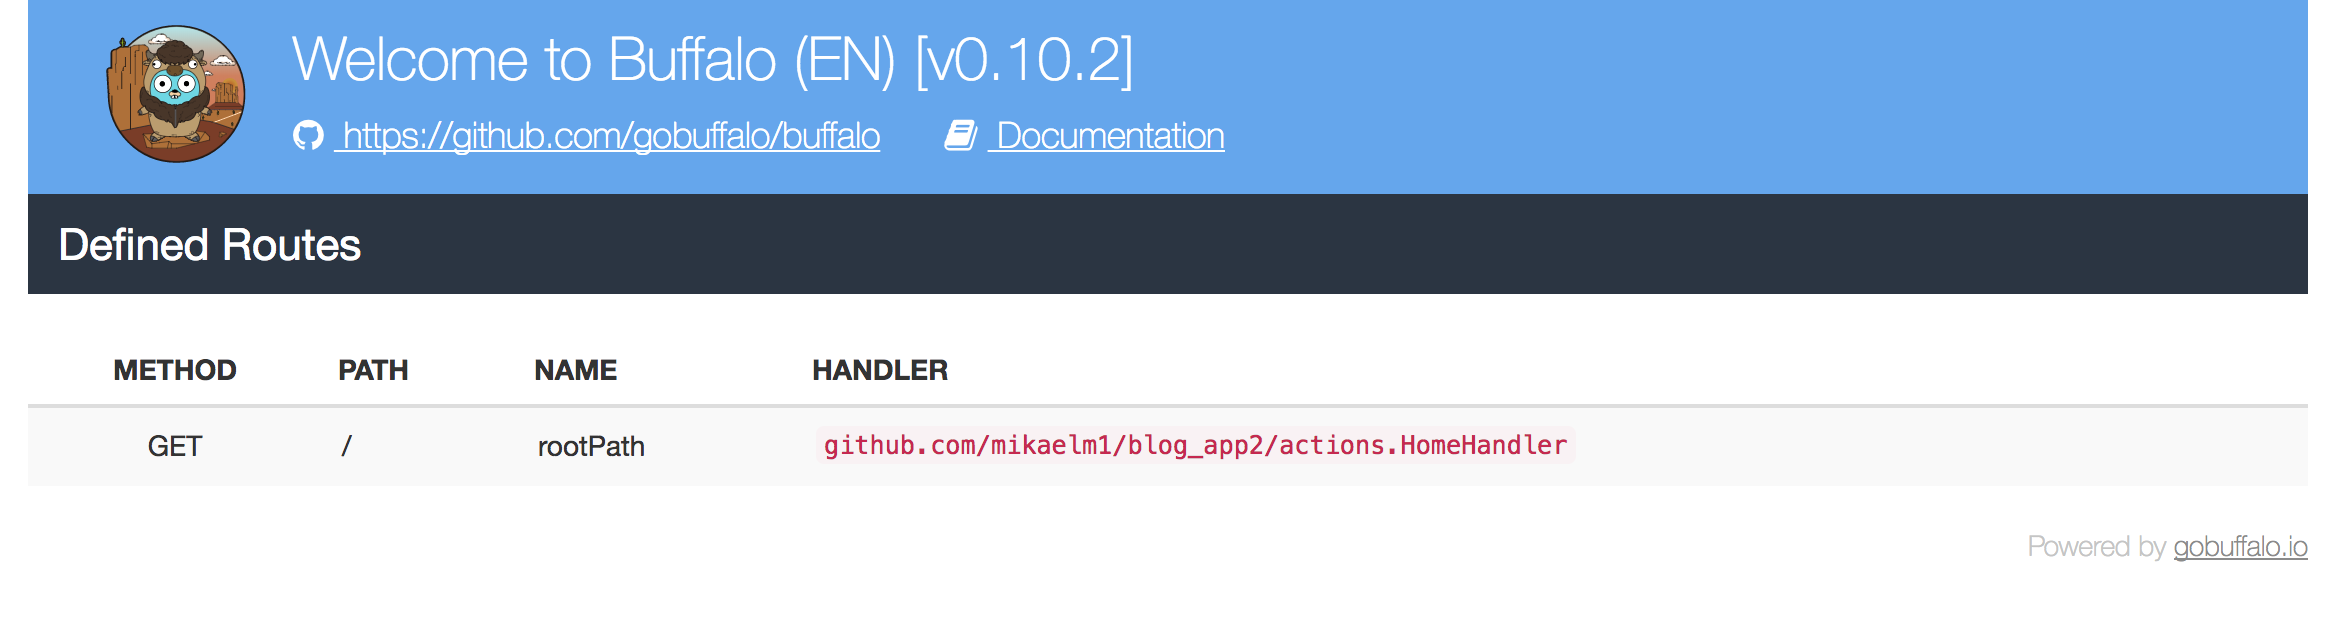
This is the default home page that Buffalo gives us when we create a project. It’s a bootstrap 3 table listing all the routes we have so far in the project. Buffalo follows the MVC software architectural pattern. The models package is equivalent to the Model, the templates directory equivalent to the Views, and the actions package is equivalent to the Controller. The main entry point of the project is in actions/app.go. This is where you configure the application variables and add middleware and routes. You should have something like this in there:
package actions

...
// imports
...

// ENV is used to help switch settings based on where the
// application is being run. Default is "development".
var ENV = envy.Get("GO_ENV", "development")
var app *buffalo.App
var T *i18n.Translator

// App is where all routes and middleware for buffalo
// should be defined. This is the nerve center of your
// application.
func App() *buffalo.App {
	if app == nil {
		app = buffalo.New(buffalo.Options{
			Env:         ENV,
			SessionName: "_blog_app2_session",
		})
		// Automatically redirect to SSL
		app.Use(ssl.ForceSSL(secure.Options{
			SSLRedirect:     ENV == "production",
			SSLProxyHeaders: map[string]string{"X-Forwarded-Proto": "https"},
		}))
		if ENV == "development" {
			app.Use(middleware.ParameterLogger)
		}
		// Protect against CSRF attacks. https://www.owasp.org/index.php/Cross-Site_Request_Forgery_(CSRF)
		// Remove to disable this.
		app.Use(csrf.New)
		// Wraps each request in a transaction.
		//  c.Value("tx").(*pop.PopTransaction)
		// Remove to disable this.
		app.Use(middleware.PopTransaction(models.DB))
		// Setup and use translations:
		var err error
		if T, err = i18n.New(packr.NewBox("../locales"), "en-US"); err != nil {
			app.Stop(err)
		}
		app.Use(T.Middleware())
		app.GET("/", HomeHandler)
		app.ServeFiles("/assets", assetsBox)
	}
	return app
}
The line app.GET("/", HomeHandler) shows that a function HomeHandler will handle any requests sent to the root path, which in our case is localhost:3000/. Open actions/home.go and you should see the HomeHandler function:
// HomeHandler is a default handler to serve up
// a home page.
func HomeHandler(c buffalo.Context) error {
	return c.Render(200, r.HTML("index.html"))
}
This function simply renders an HTML page with a status code of 200. The index.html can be found in templates/index.html. Buffalo by default uses the plush templating library and you can view a good video demo on how to use it at https://gobuffalo.io/docs/templating. By default, Buffalo comes with Bootstrap 3 enabled. I prefer Bootstrap 4, so let’s change that. Type the following two commands to install Bootstrap:
$ yarn add [email protected]
$ yarn add popper.js
Then, open assets/css/application.scss and make it look like this:
@import "~bootstrap/dist/css/bootstrap.min.css";
@import "~font-awesome/css/font-awesome.css";
These two lines import Bootstrap and Font Awesome from the node_modules directory. Next, open assets/js/application.js and make it look like this:
require("expose-loader?$!expose-loader?jQuery!jquery");
require("popper.js/dist/popper.min.js");
require("bootstrap/dist/js/bootstrap.min.js");

$(() => {

});
These import the javascript files that are required for Bootstrap 4. Now that we have our CSS and JS files setup, open templates/application.html. This is the HTML file that all of our other HTML files will inherit from. Add the following inside the .container div tag, above the partial for flash messages:
<div class="container">
    <!-- NavBar -->
    <nav class="navbar navbar-expand-lg navbar-light bg-light mb-2">
    <a class="navbar-brand" href="<%= rootPath() %>">Blog App</a>
    <button class="navbar-toggler" type="button" data-toggle="collapse" data-target="#navbarSupportedContent" aria-controls="navbarSupportedContent" aria-expanded="false" aria-label="Toggle navigation">
        <span class="navbar-toggler-icon"></span>
    </button>
    <div class="collapse navbar-collapse" id="navbarSupportedContent">
        <ul class="navbar-nav mr-auto">
        <li class="nav-item">
            <a class="nav-link" href="#">Posts</a>
        </li>
        </ul>
        <ul class="navbar-nav">
            <li class="nav-item">
                <a href="#" class="nav-link">Login</a>
            </li>
            <li class="nav-item">
                <a href="#" class="nav-link">Register</a>
            </li>
        </ul>
    </div>
    </nav>
    <!-- End NavBar -->
    <%= partial("flash.html") %>
    <%= yield %>
</div>
This will add a nav bar to every page of the app. You’ll notice that the brand item is linking to href="<%= rootPath() %>". This rootPath() is a helper that outputs the URL of the root path. You can find all the routes and their names in the project at any time by running buffalo task routes, I use this task all the time to find the names of routes because the name of a route corresponds to the template helper for that route. Now, replace everything in templates/index.html with:
<div class="row mt-5">
  <div class="col text-center">
      <h1>Welcome to my blog!</h1>
  </div>
</div>
If you visit localhost:3000 you’ll see a nav bar with a “Welcome to my blog!” message. Now that we have our assets set up, we can move on to creating our users.
Users Resource Link to heading
In this section we will create our User resource and create migrations for the User model. First, we need to create our databases, and in order to do that, we’ll run:
buffalo db create -a
You should see three *.sqlite files appear in your project directory. Buffalo has many helper commands, two of which include generating actions and resources. Generating a resource means that it will create a model and an action. Type buffalo generate -h to see all the available generators. Let’s generate resources for our users:
buffalo g r users username email admin:boolean
This command creates an action actions/users.go and a model models/user.go along with corresponding test files for each. The username, email, and admin:boolean are fields for the User, which by default are strings, but for admin we want to be a bool. Open up models/user.go and you’ll see a User struct with the fields we defined above, along with a few other functions in the file. You’ll also notice that new migrations files were added under the migrations folder. Open the one that has up in it’s name. You should see this:
create_table("users", func(t) {
	t.Column("id", "uuid", {"primary": true})
	t.Column("username", "string", {})
	t.Column("email", "string", {})
	t.Column("admin", "boolean", {})
})
Generating a resource automatically creates migrations for the model. You can view the status of all of your migrations at any time by running:
buffalo db migrate status
Which if you run now, will show that the status of the migration is “Pending”, which means it hasn’t been applied yet. To apply the migration, run:
buffalo db migrate up
If you check the status of the migration now, you’ll see that it’s set to “Applied” and that there is a SQL schema file in the migrations directory. There is one more field that we need to add to the user model and we’ll do it by hand. Make your user model look like this:
type User struct {
	ID              uuid.UUID `json:"id" db:"id"`
	CreatedAt       time.Time `json:"created_at" db:"created_at"`
	UpdatedAt       time.Time `json:"updated_at" db:"updated_at"`
	Username        string    `json:"username" db:"username"`
	Email           string    `json:"email" db:"email"`
	Admin           bool      `json:"admin" db:"admin"`
	PasswordHash    string    `json:"-" db:"password_hash"`
	Password        string    `json:"-" db:"-"`
	PasswordConfirm string    `json:"-" db:"-"`
}
We’ve added three password related fields but we will only add one of them, PasswordHash, to the database. For security reasons, storing plain text passwords in the database is a very bad idea. Therefore, we will be storing hashes of the passwords. We need to update our database schema to have this extra field on the user model. To do so, run:
buffalo db g fizz add_password
This will create two new migration files, one for up and another for down. Open the one with the up in the name and type:
add_column("users", "password_hash", "string", {"default": ""})
And then inside the down migration:
drop_column("users", "password_hash")
The up migration is adding a field password_hash of type string to the table users. We also provide a default value of an empty string because if we don’t we’ll get an error message:
Error: error executing migrations/$TIMESTAMP_add_password.up.fizz, sql: ALTER TABLE "users" ADD COLUMN "password_hash" TEXT NOT NULL;: Cannot add a NOT NULL column with default value NULL
This is because when creating migrations, a field that cannot be NULL must have a default value so that the migrator can apply this new field to any preexisting rows in the table. Ideally, we would have added this field to the first migration file so as to not need to provide a default value for the password field, but I wanted to demonstrate how manual migrations work. Also, we’ll later be adding validations on the app side of the models that will ensure that no empty passwords will be stored in the database. There is just one more step needed to apply this migration:
buffalo db migrate up
Register Users Link to heading
Now that we have our users model set up, it’s time to implement the login and register views. We’ll begin with registering users. When we generated our user resources, Buffalo gave us actions that implement common CRUD operations. You can find these in actions/users.go. This is a handy feature that can help developers get up and running quickly, but we’re going to do things a bit differently. Replace everything in that file with this:
package actions

import (
	"github.com/gobuffalo/buffalo"
	"github.com/$YOUR_USERNAME/blog_app2/models"
)

// UserRegisterGet displays a register form
func UsersRegisterGet(c buffalo.Context) error {
	// Make user available inside the html template
	c.Set("user", &models.User{})
	return c.Render(200, r.HTML("users/register.html"))
}
This handler adds an empty user model to the Context. You can think of the Context as a way to pass data throughout the lifecycle of a request. For example, data can be added to a request inside a middleware handler before it ever reaches the actual handler for a route, and data stored on the Context is also available inside templates. Every request has its own Context. Next, open actions/app.go and replace:
app.Resource("/users", UsersResource{&buffalo.BaseResource{}})
with this:
auth := app.Group("/users")
auth.GET("/register", UsersRegisterGet)
Grouping routes together is a great way to organize routes. I like to group routes by action or functionality. In this case, every route that we register on the auth group will start with a /users in its URL. The UsersRegisterGet function handles GET calls to /users/register by rendering an HTML page with an empty User object in the template. We don’t have a register.html file yet, so let’s create it. Paste the following into templates/users/register.html:
<div class="row mt-3 justify-content-center">
<div class="col-lg-6 col-md-8 col-sm-10">
<div class="card">
<div class="card-header">
<h3>Register</h3>
</div>
<div class="card-body">
<%= if (errors) { %>
<%= for (key, val) in errors { %>
<div class="alert alert-danger alert-dismissible fade show m-1" role="alert">
<%= val %>
<button type="button" class="close" data-dismiss="alert" aria-label="Close">
<span aria-hidden="true">×</span>
</button>
</div>
<% } %>
<% } %>
<form action="<%= usersRegisterPath() %>" method="GET" novalidate>
<div class="form-group">
<label for="email">Email address</label>
<input type="email" name="Email" class="form-control" id="email">
</div>
<div class="form-group">
<label for="username">Username</label>
<input type="text" name="Username" id="username" class="form-control">
</div>
<div class="form-group">
<label for="pwd1">Password</label>
<input name="Password" type="password" class="form-control" id="pwd1">
</div>
<div class="form-group">
<label for="passwordConfirm">Confirm password</label>
<input name="PasswordConfirm" type="password" class="form-control" id="passwordConfirm">
</div>
<button type="submit" class="btn btn-primary btn-block">Register</button>
</form>
</div>
</div>
</div>
</div>
If you visit localhost:3000/users/register, you’ll see a registration form. Clicking on the “Register” button sends a GET request to the same URL. You’ll notice that the form’s action has <%= usersRegisterPath() %>. That is the name of the route for the registration page, which you can find by running:
buffalo task routes
We want this form to send a POST request, but we don’t have a handler for that yet. First, change the form’s method from GET to POST. Then, inside actions/users.go add a handler to process the form’s POST request:
// UsersRegisterPost adds a User to the DB. This function is mapped to the
// path POST /accounts/register
func UsersRegisterPost(c buffalo.Context) error {
// Allocate an empty User
user := &models.User{}
// Bind user to the html form elements
if err := c.Bind(user); err != nil {
return errors.WithStack(err)
}
// Get the DB connection from the context
tx := c.Value("tx").(*pop.Connection)
// Validate the data from the html form
verrs, err := user.Create(tx)
if err != nil {
return errors.WithStack(err)
}
if verrs.HasAny() {
// Make user available inside the html template
c.Set("user", user)
// Make the errors available inside the html template
c.Set("errors", verrs.Errors)
// Render again the register.html template that the user can
// correct the input.
return c.Render(422, r.HTML("users/register.html"))
}
// If there are no errors set a success message
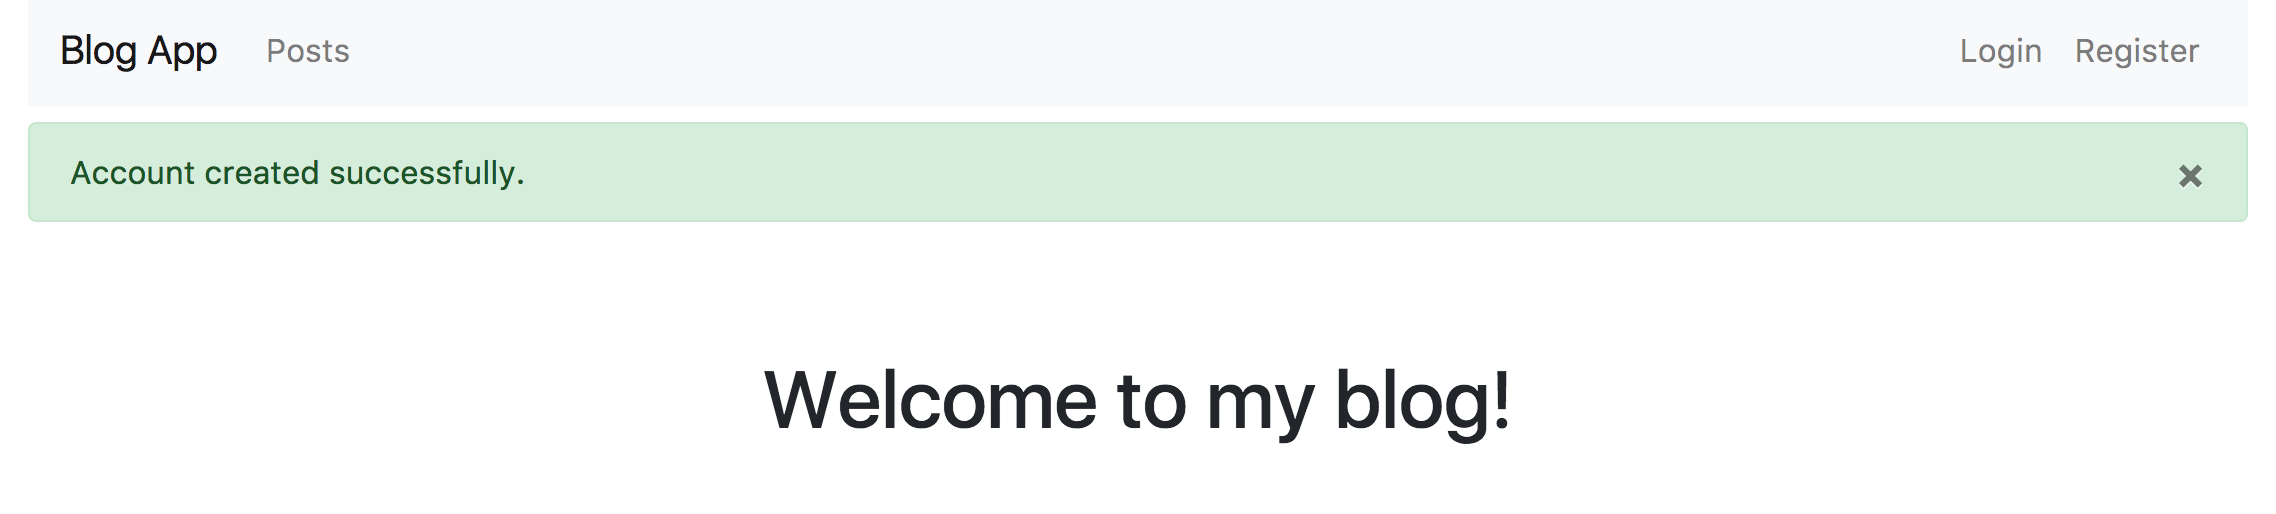
c.Flash().Add("success", "Account created successfully.")
// and redirect to the home page
return c.Redirect(302, "/")
}
You’ll get an error at this point, but we’ll fix it shortly. Before we move on, register this handler with the app in actions/app.go:
auth := app.Group("/users")
auth.GET("/register", UsersRegisterGet)
auth.POST("/register", UsersRegisterPost)
And change the nav bar’s register link so that we don’t have to manually type in the register URL:
<!--  In application.html -->
<li class="nav-item">
	<a href="<%= usersRegisterPath() %>" class="nav-link">Register</a>
</li>
The above handler creates an empty User object and then calls the Context’s bind function, which takes all the values in the form and matches them to the form tags of the struct being passed to it, which in this case is a User struct. The User model does not have any form tags and so it defaults to using the struct’s property names for form binding. You can customize the form tag values by, for example:
type User struct {
	Username string `json:"username" db:"username" form:"username"`
}
in which case you would change the form username’s name value from “Username” to “username”. After we bind the form values to the model, we call a function Create which we haven’t written yet, and which will attempt to add a new user to the database. The Create function might return errors, and if it does, we add both the user object and the errors to the context and render the registration form again. The form will then display the errors to the user, which is what this part of the template is doing:
<%= if (errors) { %>
<%= for (key, val) in errors { %>
<div class="alert alert-danger alert-dismissible fade show m-1" role="alert">
<%= val %>
<button type="button" class="close" data-dismiss="alert" aria-label="Close">
<span aria-hidden="true">×</span>
</button>
</div>
<% } %>
<% } %>
If there are no errors, then it sets a flash message to the context and redirects to the home page, and the home page will show a flash message saying the registration was successful. Every other handler that we make for creating objects will follow a similar design to this one. Now let’s implement the Create function. Add this inside models/user.go:
// Create validates and creates a new User.
func (u *User) Create(tx *pop.Connection) (*validate.Errors, error) {
	u.Email = strings.ToLower(u.Email)
	u.Admin = false
	pwdHash, err := bcrypt.GenerateFromPassword([]byte(u.Password), bcrypt.DefaultCost)
	if err != nil {
		return validate.NewErrors(), errors.WithStack(err)
	}
	u.PasswordHash = string(pwdHash)
	return tx.ValidateAndCreate(u)
}
The Create function sets all users to not admins by default, we will need this admin field later. It then generates a hash based on the plaintext password and this hash is what we will store in the database for the user’s password field. Finally, it calls validators and attempts to write the user to the database. There are three types of optional validators we can have for our models and all them can be found inside models/user.go as the were automatically added when we generated the resource:
// Validate gets run every time you call a "pop.Validate*" (pop.ValidateAndSave, pop.ValidateAndCreate, pop.ValidateAndUpdate) method.
// This method is not required and may be deleted.
func (u *User) Validate(tx *pop.Connection) (*validate.Errors, error) {
	return validate.Validate(
		&validators.StringIsPresent{Field: u.Username, Name: "Username"},
		&validators.StringIsPresent{Field: u.Email, Name: "Email"},
	), nil
}

// ValidateCreate gets run every time you call "pop.ValidateAndCreate" method.
// This method is not required and may be deleted.
func (u *User) ValidateCreate(tx *pop.Connection) (*validate.Errors, error) {
	return validate.NewErrors(), nil
}

// ValidateUpdate gets run every time you call "pop.ValidateAndUpdate" method.
// This method is not required and may be deleted.
func (u *User) ValidateUpdate(tx *pop.Connection) (*validate.Errors, error) {
	return validate.NewErrors(), nil
}
These validations are run before a database write is committed if you call a validation check, and the comments above each describe exactly in which circumstances each of them are run. Validate is run whether you try to create or update an object and so we will put all of our validators in there. Buffalo has a bunch of prebuilt validators, which you can find at https://github.com/markbates/validate/tree/master/validators.
Let’s add a few more validators, some of which are already implemented in Buffalo and a couple which we will create ourselves:
func (u *User) Validate(tx *pop.Connection) (*validate.Errors, error) {
	return validate.Validate(
		&validators.StringIsPresent{Field: u.Username, Name: "Username"},
		&validators.StringIsPresent{Field: u.Email, Name: "Email"},
		&validators.EmailIsPresent{Name: "Email", Field: u.Email},
		&validators.StringIsPresent{Field: u.Username, Name: "Username"},
		&validators.StringIsPresent{Field: u.Password, Name: "Password"},
		&validators.StringsMatch{Name: "Password", Field: u.Password, Field2: u.PasswordConfirm, Message: "Passwords do not match."},
		&UsernameNotTaken{Name: "Username", Field: u.Username, tx: tx},
		&EmailNotTaken{Name: "Email", Field: u.Email, tx: tx},
	), nil
}
At this point you’ll get an error because two of these have not been defined yet, so let’s define them in the same file:
type UsernameNotTaken struct {
	Name  string
	Field string
	tx    *pop.Connection
}

func (v *UsernameNotTaken) IsValid(errors *validate.Errors) {
	query := v.tx.Where("username = ?", v.Field)
	queryUser := User{}
	err := query.First(&queryUser)
	if err == nil {
		// found a user with same username
		errors.Add(validators.GenerateKey(v.Name), fmt.Sprintf("The username %s is not available.", v.Field))
	}
}

type EmailNotTaken struct {
	Name  string
	Field string
	tx    *pop.Connection
}

// IsValid performs the validation check for unique emails
func (v *EmailNotTaken) IsValid(errors *validate.Errors) {
	query := v.tx.Where("email = ?", v.Field)
	queryUser := User{}
	err := query.First(&queryUser)
	if err == nil {
		// found a user with the same email
		errors.Add(validators.GenerateKey(v.Name), "An account with that email already exists.")
	}
}
In order to define a custom validator, you must have a struct that has whatever fields you want, but it has to implement the IsValid(errors *validate.Errors) function. These two validators make sure that the emails and usernames stay unique in the database. Now try to register a new user. You should get a stack trace error that says a CSRF token is missing. This is because anytime you submit a form that is not a GET request, you must pass in a token to guard against CSRF attacks. Since we’ll be needing this token a lot, it’s best to create a custom template helper. Buffalo has a lot of helpers, a list of which can be found at https://gobuffalo.io/docs/helpers. In order to create a custom helper, open actions/render.go and replace the init function with this:
func init() {
	r = render.New(render.Options{
		// HTML layout to be used for all HTML requests:
		HTMLLayout: "application.html",
		// Box containing all of the templates:
		TemplatesBox: packr.NewBox("../templates"),
		AssetsBox:    assetsBox,
		// Add template helpers here:
		Helpers: render.Helpers{
			"csrf": func() template.HTML {
				return template.HTML("<input name=\"authenticity_token\" value=\"<%= authenticity_token %>\" type=\"hidden\">")
			},
		},
	})
}
Now, all of our templates can call this helper function which will insert the CSRF token as a hidden input field. Add the helper call to the register form:
<form action="<%= usersRegisterPath() %>" method="POST" novalidate>
	<%= csrf() %>
	<div class="form-group">
		<label for="email">Email address</label>
		<input type="email" name="Email" class="form-control" id="email">
	</div>
Try registering a user. You should be able to successfully register a user and be redirected to the home page.
Login and Logout Link to heading
Now that users can register, they should be able to log in and log out. Add the two functions that will handle logins inside actions/users.go:
// UsersLoginGet displays a login form
func UsersLoginGet(c buffalo.Context) error {
	return c.Render(200, r.HTML("users/login"))
}

// UsersLoginPost logs in a user.
func UsersLoginPost(c buffalo.Context) error {
	user := &models.User{}
	// Bind the user to the html form elements
	if err := c.Bind(user); err != nil {
		return errors.WithStack(err)
	}
	tx := c.Value("tx").(*pop.Connection)
	err := user.Authorize(tx)
	if err != nil {
		c.Set("user", user)
		verrs := validate.NewErrors()
		verrs.Add("Login", "Invalid email or password.")
		c.Set("errors", verrs.Errors)
		return c.Render(422, r.HTML("users/login"))
	}
	c.Session().Set("current_user_id", user.ID)
	c.Flash().Add("success", "Welcome back!")
	return c.Redirect(302, "/")
}
And register the handlers with the app:
auth.GET("/login", UsersLoginGet)
auth.POST("/login", UsersLoginPost)
At this point you’ll get an error about Authorize not being defined, so let’s implement that. Add it to the models/user.go file:
// Authorize checks user's password for logging in
func (u *User) Authorize(tx *pop.Connection) error {
	err := tx.Where("email = ?", strings.ToLower(u.Email)).First(u)
	if err != nil {
		if errors.Cause(err) == sql.ErrNoRows {
			// couldn't find an user with that email address
			return errors.New("User not found.")
		}
		return errors.WithStack(err)
	}
	// confirm that the given password matches the hashed password from the db
	err = bcrypt.CompareHashAndPassword([]byte(u.PasswordHash), []byte(u.Password))
	if err != nil {
		return errors.New("Invalid password.")
	}
	return nil
}
And finally add a new template file templates/users/login.html:
<div class="row mt-3 justify-content-center">
<div class="col-lg-6 col-md-8 col-sm-10">
<div class="card">
<div class="card-header">
<h3>Login</h3>
</div>
<div class="card-body">
<%= if (errors) { %>
<%= errors %>
<%= for (key, val) in errors { %>
<div class="alert alert-danger alert-dismissible fade show m-1" role="alert">
<%= val %>
<button type="button" class="close" data-dismiss="alert" aria-label="Close">
<span aria-hidden="true">×</span>
</button>
</div>
<% } %>
<% } %>
<form action="<%= usersLoginPath() %>" method="POST" novalidate>
<%= csrf() %>
<div class="form-group">
<label for="email">Email address</label>
<input type="email" name="Email" class="form-control" id="email">
</div>
<div class="form-group">
<label for="pwd">Password</label>
<input name="Password" type="password" class="form-control" id="pwd">
</div>
<button type="submit" class="btn btn-primary btn-block">Login</button>
</form>
</div>
</div>
</div>
</div>
As you can see, the process of handling GET and POST requests and binding a model to a form to process it, is very similar to how we implemented the register routes. The two main differences are that first, there is a new helper method on the User struct named Authorize that retrieves the user by their email and then checks the plaintext password against the hashed one that’s stored in the database. Secondly, we use sessions to store the user’s ID, which we will use later to determine if the user is logged in or not.
Now that we have login working, let’s implement the logout functionality. First, add the handler:
// UsersLogout clears the session and logs out the user.
func UsersLogout(c buffalo.Context) error {
	c.Session().Clear()
	c.Flash().Add("success", "Goodbye!")
	return c.Redirect(302, "/")
}
And then register the route:
app.ServeFiles("/assets", assetsBox)
auth := app.Group("/users")
auth.GET("/register", UsersRegisterGet)
auth.POST("/register", UsersRegisterPost)
auth.GET("/login", UsersLoginGet)
auth.POST("/login", UsersLoginPost)
auth.GET("/logout", UsersLogout)
Logging out is very simple, we just clear the session, which removes the user’s ID from the session storage, and redirect to the home page.
User Middleware Link to heading
If you login, you’ll notice that the nav bar still has “Login” and “Register” buttons. It would make more sense if these two buttons were replaced by a “Logout” button, so let’s update the nav bar:
<!-- NavBar -->
<nav class="navbar navbar-expand-lg navbar-light bg-light mb-2">
<a class="navbar-brand" href="<%= rootPath() %>">Blog App</a>
<button class="navbar-toggler" type="button" data-toggle="collapse" data-target="#navbarSupportedContent" aria-controls="navbarSupportedContent" aria-expanded="false" aria-label="Toggle navigation">
	<span class="navbar-toggler-icon"></span>
</button>
<div class="collapse navbar-collapse" id="navbarSupportedContent">
	<ul class="navbar-nav mr-auto">
	<li class="nav-item">
		<a class="nav-link" href="#">Posts</a>
	</li>
	</ul>
	<ul class="navbar-nav">
	<%= if (current_user) { %>
		<li class="nav-item">
		<a href="<%= usersLogoutPath() %>" class="nav-link">Logout</a>
		</li>
		<% } else { %>
		<li class="nav-item">
			<a href="<%= usersLoginPath() %>" class="nav-link">Login</a>
		</li>
		<li class="nav-item">
			<a href="<%= usersRegisterPath() %>" class="nav-link">Register</a>
		</li>
	<% } %>
	</ul>
</div>
</nav>
<!-- End NavBar -->
The if statement checks for a user object stored in the Context, and if it exists it only sets a logout button. Data stored in the Session lives between requests, but data stored in the Context only stays there for the duration of a single request. We’re only storing the user’s ID in the Session. We need a way to store the actual object in the Context, which is where middleware comes in. You will have noticed that in the App function, we’re already using a few built-in middleware, one example of which is:
app.Use(csrf.New)
which sets the CSRF token for every request. We can also define our own custom middleware. So let’s implement one that will set a user object on the Context if the user is logged in. Add this to actions/users.go:
// SetCurrentUser attempts to find a user based on the current_user_id
// in the session. If one is found it is set on the context.
func SetCurrentUser(next buffalo.Handler) buffalo.Handler {
	return func(c buffalo.Context) error {
		if uid := c.Session().Get("current_user_id"); uid != nil {
			u := &models.User{}
			tx := c.Value("tx").(*pop.Connection)
			err := tx.Find(u, uid)
			if err != nil {
				return errors.WithStack(err)
			}
			c.Set("current_user", u)
		}
		return next(c)
	}
}
This middleware function checks to see if a user’s ID is stored in the Session, if it is, it finds the user by the ID and stores the object on the Context. In order for this middleware to actually work, we need to register it with the app in actions/app.go:
app.Use(csrf.New)
app.Use(middleware.PopTransaction(models.DB))
app.Use(SetCurrentUser)
This middleware is run before every single request reaches its designated handler. Now if you login and logout, you’ll notice that the options in the nav bar change.
Conclusion Link to heading
In this tutorial we covered the fundamentals of how Buffalo works, we set up our database, wrote some migrations manually, created resources for users, implemented authentication, and wrote our own custom middleware. In part 2 we will implement functionality for creating blog posts and for commenting on posts.